
So you want to post a video from YouTube to Instagram? It's more than just a simple upload. You'll need to download the original video, completely reformat it from a widescreen (16:9) to a vertical (9:16) layout, and then chop it down to fit Instagram’s much shorter time limits. It’s all about adapting your deep-dive content for a fast-scrolling, mobile-first crowd.
Why Bother Repurposing YouTube Videos for Instagram?
Let's be real: creating brand-new, original video content for every single social media platform is a fast track to burnout. Smart repurposing is your best friend here, and your YouTube channel is basically a goldmine of content just waiting to be clipped for Instagram.
The two platforms are built for totally different viewing habits. YouTube is where people go for in-depth, searchable content. Instagram, on the other hand, is all about quick, discoverable moments. Adapting your videos bridges that gap, letting you connect with a whole new audience segment without having to film a single new thing. It’s not just about saving time—it’s about making your content work smarter and harder for you.
To really nail this, it helps to see the core differences side-by-side.
YouTube vs. Instagram Video At a Glance
This quick table breaks down what you need to know when shifting your content from one platform to the other. It’s a handy cheat sheet for understanding why a straight re-upload just won’t work.
| Attribute | YouTube (Standard Video) | Instagram (Reels & Stories) |
|---|---|---|
| Primary Orientation | Horizontal (16:9) | Vertical (9:16) |
| Typical Length | 2-15+ minutes | 15-90 seconds |
| User Intent | Search & Learn (in-depth) | Discover & Browse (quick entertainment) |
| Content Style | Educational, narrative, long-form | High-impact, trendy, bite-sized |
| Audio | Crucial, often with detailed narration | Often viewed without sound; captions are key |
As you can see, the formats are fundamentally different. A horizontal video will get awkwardly cropped on Instagram, and a 10-minute deep dive won’t hold the attention of someone swiping through Reels. Adapting is non-negotiable.
Tap Into Different User Habits
Think about it from the user's perspective. Someone on YouTube has likely settled in, ready to watch a 15-minute tutorial or a detailed product review. An Instagram user is probably killing a few minutes in line for coffee, scrolling for something that grabs their attention instantly.
By pulling out the most exciting or valuable moments from your longer YouTube videos, you’re speaking their language. You’re meeting them where they are and giving them a taste of your content that fits their context perfectly.
This strategy is all about tailoring your core message to fit the platform. It's how you boost engagement and make sure your content actually gets seen by the right people at the right time.
Instagram is a video-first world now. It’s the third most visited website globally, with over 500 million daily active users. A huge chunk of that attention—over 60% of time spent on the platform—goes to short-form vertical videos like Reels and Stories.
Repurposing isn’t just a shortcut; it's a critical piece of any modern content strategy. It expands your reach, reinforces your brand message, and ensures your best work gets the visibility it deserves across multiple channels. When you're ready to think bigger, this tactic fits perfectly into your broader content marketing strategies.
Prepping Your YouTube Video for Instagram
Alright, so you’ve decided to post video from YouTube to Instagram. This is where the real work begins—the hands-on part of turning a widescreen, long-form video into a vertical, snackable clip that feels right at home on Instagram.
It’s really a two-step dance: first, you need to get your hands on the video file, and then you’ve got to edit it to fit Instagram’s vibe.
The best way to start is by downloading your own content directly from YouTube Studio. This guarantees you’re working with the highest quality file possible. It’s best to steer clear of third-party downloaders for other people's videos to avoid any copyright headaches or low-res files.
Once the video is on your computer, it's time to start editing. The main goals here are simple: trim it down and change its shape.
Trimming and Reframing for Mobile
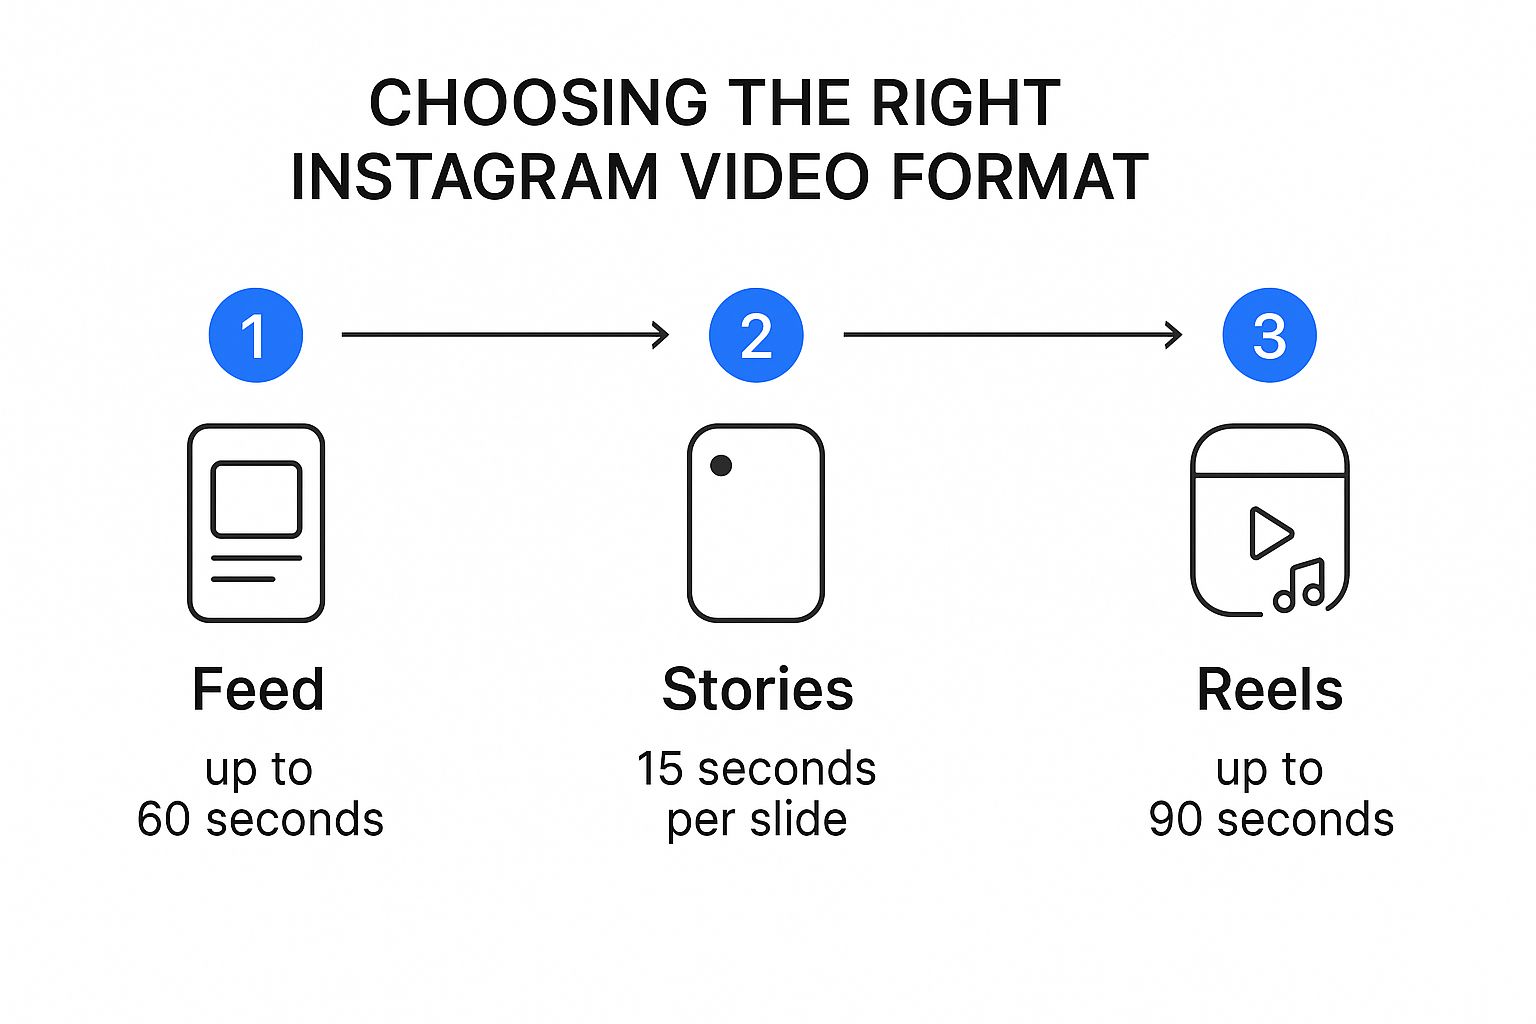
First things first, you need to hunt for the gold within your YouTube video. Find that one killer segment that can stand on its own. Instagram has different time limits for its video formats, and you need to play by the rules.
- Instagram Reels can run up to 90 seconds. This is the perfect format to show off the most exciting or valuable piece of your longer video.
- Instagram Stories are capped at 60-second clips, making them great for quick tips or behind-the-scenes moments.
- Feed Videos can technically be longer, but honestly, keeping them under a minute is usually the best move for engagement.
Next up is the aspect ratio. Your YouTube videos are probably in a 16:9 widescreen format, which just looks awkward and tiny on Instagram. You’ll want to convert it to a vertical 9:16 ratio for Reels and Stories. This is more than just resizing; it’s about reframing the shot to make sure the key action stays front and center on a phone screen.
If you want to get into the nitty-gritty of this, we've got a whole guide on the best aspect ratios for social media.
Remember, the goal isn't just to chop up a video. It's to create a self-contained, engaging clip that provides value on its own, even without the context of the full YouTube video.
Choosing the Right Editing Tools
You don't need a fancy film degree to pull this off. There are plenty of user-friendly tools out there for both desktop and mobile that make this whole process a breeze.
If you’re working on a desktop, tools like CapCut or Clipchamp have super simple interfaces for trimming clips, changing aspect ratios, and adding text. If you prefer editing on the go, mobile apps like InShot and Splice pack a serious punch right from your phone. You can reformat a video and upload it straight to Instagram in minutes.
The key is finding a tool that feels intuitive to you. The effort is worth it—posts with videos on Instagram get 49% more engagement than static photos. It just goes to show why video is such a critical part of any modern social strategy.
Optimizing Your Clips for Instagram Reels

Just trimming and resizing your YouTube video is only half the battle. If you really want to make an impact when you post video from YouTube to Instagram, you’ve got to think about discovery. And there’s no better tool for that right now than Instagram Reels.
Reels are built to reach people who don’t already follow you, which makes them an absolute powerhouse for growing your account. An analysis of over 4 million Instagram posts found that Reels get 36% more reach than carousels and an incredible 125% more reach than single-image posts. It's a massive opportunity.
This format is all about making an immediate impression. Your main job is to find the perfect "hook" from your long-form YouTube video—that one moment that grabs a viewer and stops their scroll in the first three seconds.
The Art of the Three-Second Hook
Think of it like a movie trailer. You're searching for the most exciting, surprising, or valuable snippet from your original content. Is it a shocking statistic? A visually stunning shot? The punchline to a great story?
- Ask a Question: Kick off your clip with a question that your video immediately answers.
- Show the Result First: Display the final outcome of a project or tutorial to make people curious about the process.
- Use a Bold Statement: Open with a controversial or surprising opinion that forces them to pause.
Once you have your hook, the rest of the clip needs to deliver on that initial promise. To get the timing just right, check out our detailed guide on the best video lengths for social media.
Your repurposed clip shouldn't feel like a random excerpt. It needs to be a self-contained piece of content that offers value, entertains, or sparks curiosity all on its own.
Finally, don’t forget the finishing touches. Pair your video with trending audio to give it a boost in the Reels algorithm. Write a caption that encourages conversation—ask a question or invite people to share their own experiences. A smart mix of broad and niche hashtags will help Instagram categorize your content and show it to the right audience, turning a simple video clip into a genuine growth tool.
Automating Your Workflow with AI Tools
Manually prepping every single clip works, but let's be honest—it's a massive time sink. If you want to consistently post video from YouTube to Instagram, you need a system that’s both faster and smarter. This is where AI-powered tools completely change the game for content repurposing.
Platforms like ShortsNinja are built to handle the most tedious parts of this process. Forget downloading, manually scrubbing through footage, trimming, and reframing. You just paste a YouTube link and let the AI do the heavy lifting.
This isn't just a simple trimmer. The technology is designed to pinpoint the most engaging parts of your long-form video. It intelligently analyzes your content to find moments with the highest potential for going viral, automatically crops them into the perfect vertical format, and spits out ready-to-share clips in minutes.
The Power of Intelligent Clip Selection
What really makes this approach a game-changer is the AI's ability to spot the gold in your videos. It’s trained to look for hooks, emotional peaks, and valuable takeaways that a human might easily miss during a quick scan. This saves you hours and, more importantly, ensures the clips you post actually have a fighting chance of performing well.
This isn't just about saving time; it's about using smart technology to make better content decisions. By automating clip selection, you're tapping into data-driven insights to boost your content's potential reach and engagement.
For creators and marketers, this means you can finally build a consistent posting schedule without the burnout. Reclaiming those hours lets you focus on the bigger picture—like strategy and community engagement—instead of getting bogged down in the editing weeds. Our guide on AI video editing tools dives deeper into how this tech can support your creation process.
The screenshot below shows just how clean and simple the ShortsNinja interface is, turning a complex job into just a few clicks.
The layout is designed for speed, guiding you from pasting a link to generating clips without any friction.
The difference between the old way and the new way is stark. Let’s break down the time and effort involved.
Manual Effort vs Automated Workflow
| Task | Manual Process | Automated with ShortsNinja |
|---|---|---|
| Video Download | Find a third-party tool, download the full video (5-10 mins). | No download needed; just paste the YouTube link. |
| Clip Identification | Manually scrub through the entire video to find good moments (15-30 mins). | AI automatically identifies and suggests top clips (~1 min). |
| Editing & Trimming | Import into editor, trim clips, add basic cuts (20-40 mins). | Clips are auto-trimmed and ready for review. |
| Reframing | Manually adjust aspect ratio from 16:9 to 9:16 for each clip (10-15 mins). | AI automatically reframes to vertical format. |
| Captioning | Transcribe and add captions manually or with a separate tool (10-20 mins). | Auto-captions are generated and can be styled instantly. |
| Total Time | ~1 – 1.5 hours per video | ~5 – 10 minutes per video |
As you can see, automation doesn't just shave off a few minutes; it transforms the entire workflow, making content repurposing scalable and sustainable.
Scaling Your Video Strategy
Automating your workflow is the key to scaling your video strategy. It’s how you maintain a high-frequency posting schedule across multiple platforms without letting quality slide. This is the secret top creators use to keep their audiences hooked day after day.
Knowing the different time limits for Instagram formats is crucial, and AI tools can automatically trim your clips to fit perfectly. For a deeper dive into using artificial intelligence for these kinds of video adjustments, check out this comprehensive AI Video Editing Guide. It's a great next step toward mastering a high-impact, automated content system.
Common Mistakes to Avoid When Reposting
If you want to successfully post a video from YouTube to Instagram, you have to sidestep the common pitfalls that scream "low-effort repost." So many creators stumble right here, killing engagement before anyone even gets a chance to watch. All that hard work on the original video goes down the drain because of a few simple, preventable mistakes.
One of the most jarring errors is ignoring the aspect ratio. When you drop a horizontal 16:9 video into a vertical 9:16 Reels feed, you get those huge, ugly black bars or awkward cropping. It just looks unprofessional and completely out of place on the platform.
Another big one? Forgetting that most people scroll with the sound off. If your clip relies entirely on someone talking, but you haven't added any on-screen text, you’re losing a massive chunk of your audience right from the start.
The Most Common Reposting Fails
Let’s get into the specific slip-ups we see all the time. Knowing what not to do is half the battle.
-
Ignoring Copyrighted Audio: Ripping a clip from YouTube with licensed music is the fastest way to get your Reel muted or completely taken down by Instagram. Stick to the audio in Instagram’s own library or make sure you have the rights to whatever you’re using.
-
Forgetting Captions: A silent video with zero context is basically just a GIF nobody asked for. Adding burned-in captions makes your content accessible and understandable for the 85% of users scrolling in silence.
Repurposing isn’t just about moving a file from one platform to another; it's about translating the experience. The goal is to make the content feel native to Instagram, not like a visitor from YouTube.
Got Questions About Repurposing? We've Got Answers
When you start thinking about turning your YouTube videos into Instagram content, a few questions pop up almost immediately. Let's walk through the most common ones so you can get started with total confidence.
The big one is always about copyright: Can I post someone else's YouTube video to my Instagram?
The short and simple answer is no, at least not without getting their explicit permission first. Grabbing someone else's video and posting it as your own is a copyright violation. That can get your post taken down, or even worse, get your account hit with a penalty. The golden rule is to always stick to repurposing your own content.
Getting Your Video Lengths and Captions Right
Another thing people always ask is how long their clips should be for different spots on Instagram. You’ll want to trim your content to fit where it’s going to live—it makes a huge difference in how people engage with it.
- Reels: Your goal here is to keep it under 90 seconds. Honestly, the real sweet spot is usually much shorter, somewhere between 15-30 seconds, to keep people from swiping away.
- Stories: These are perfect for quick, in-the-moment updates. Keep each individual Story clip under 60 seconds to hold attention as people tap through.
The whole idea is to share one complete, valuable thought without getting cut off. A clip that ends abruptly just leaves your viewers confused and frustrated.
Finally, what's the easiest way to add captions? Since a huge number of people watch videos with the sound off, captions are absolutely essential.
For quick, on-the-fly editing, mobile apps like CapCut and InShot have simple, built-in captioning features that get the job done. But if you're looking for a more automated workflow, a tool like ShortsNinja can generate them for you instantly.
Ready to stop wasting time and start creating clips that actually grow your audience? With ShortsNinja, you can turn any YouTube video into dozens of share-worthy short videos in just a few clicks. Try it now and see how easy it can be at https://shortsninja.com.