

Posting on YouTube is a pretty straightforward process on the surface: get your video ready, click the 'Create' button, punch in your title and description, and you’re off to the races. But that first step—proper file preparation—is where a lot of creators stumble. Getting it right from the start is the secret to a professional look and a headache-free upload.
Preparing Your Video File for a Flawless Upload
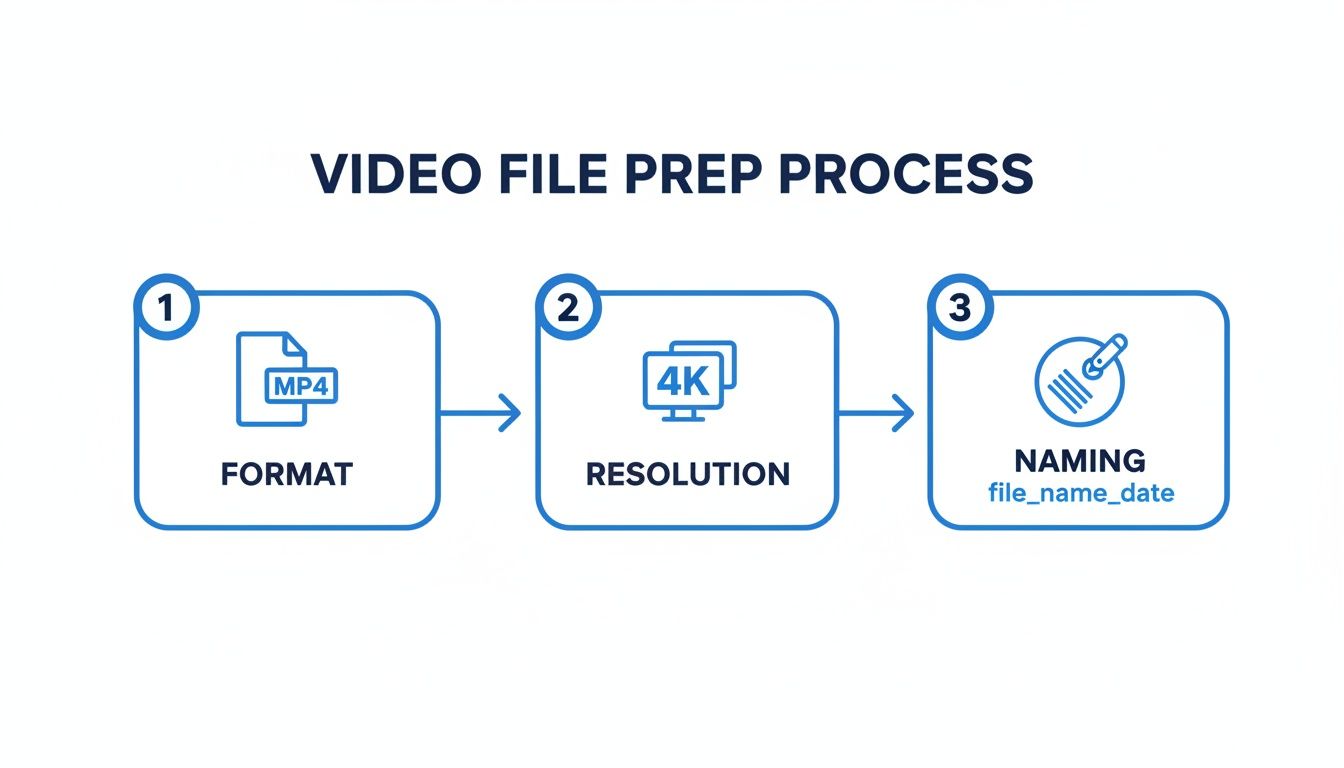
Before you even dream of hitting that upload button, the file you’ve created is setting the stage. Think of it as your pre-flight checklist. Nailing the technical details here means a smooth journey from your hard drive to your audience's screens.
The gold standard for YouTube is an MP4 format using the H.264 video codec. This combo is the sweet spot between high quality and a file size that won’t take all day to upload. It’s exactly what you want.
When it comes to resolution, 1080p (1920×1080 pixels) is your baseline for a crisp, professional video. If your gear can handle it, exporting in 4K is even better. Not only does it look incredible, but it also future-proofs your content as viewer displays get sharper. It's also smart to think about how people will watch. Knowing the best aspect ratios for different platforms can help you frame your shots perfectly from the get-go.
Nail Your File Size and Naming
Huge, uncompressed 4K files can feel like they take an eternity to upload. A smarter workflow involves compressing your video without a noticeable drop in quality. Tools like HandBrake or even the built-in export settings in software like Adobe Premiere Pro can shrink your file size down significantly. You’re aiming for a bitrate that keeps the details sharp but makes the file manageable.
Here's a simple tip that’s easy to overlook: name your file properly. A descriptive name like
your-brand-how-to-post-on-youtube-guide.mp4does more than just keep you organized. It gives YouTube’s algorithm an early clue about what your video is about.
Finally, remember that video is only half the battle. Crisp, clear audio is non-negotiable for a successful YouTube video. If you’re serious about keeping viewers engaged, it's worth looking into the best budget USB microphones to make sure your voiceovers or commentary sound fantastic. This prep work is the foundation for a video that not only looks professional but also performs well.
Navigating the YouTube Upload Process
Okay, you’ve got your video file polished and ready to go. Now it's time to actually get it onto YouTube. This part can feel like you're sitting at a mission control panel with all its screens and settings, but don't let it intimidate you. Every single option has a purpose, and knowing what they do is the first step to a killer launch.
Your journey begins when you click the big ‘Create’ button at the top right of the YouTube homepage and hit ‘Upload video.’ This pulls up the YouTube Studio uploader, which is basically a simple drag-and-drop window. Just grab your MP4 file and drop it in. The moment you do, YouTube starts working its magic.
Understanding the Initial Checks
You'll immediately see a progress bar as your video uploads, but behind the scenes, YouTube is already running some initial checks. The system is scanning for potential copyright claims and checking if your video is suitable for ads before it even has a chance to go live. This is a huge help because it lets you catch and fix any problems early, saving you from monetization headaches or content strikes later on.
While all that is happening, you're brought to the first and most important screen: the Details page. This is where you'll spend most of your time, adding all the metadata that helps your video get found. The best part? You don't have to sit there and wait for the upload to finish before you start filling everything out.
The simple workflow we covered earlier—nailing the format, resolution, and file name—sets the stage for everything you do in the uploader.
As your video processes, you'll notice it goes through different quality stages. A standard-definition (SD) version becomes available pretty quickly, but the higher-quality HD and 4K versions take a bit longer to process in the background.
Pro Tip: I always upload my videos as 'Private' or 'Unlisted' first. Don't make it public until you see that little 'HD' or '4K' badge appear on your video in the Studio. This tiny step guarantees that the first people who see your video get the crisp, high-res version you worked so hard on, not a blurry mess.
Your Launch Mission Control
The uploader is designed to walk you through a few key tabs: Details, Monetization (if you're in the YouTube Partner Program), Video Elements, and Visibility. Think of each one as a step toward telling both the algorithm and your audience exactly what your video is all about.
- Details: This is where you give your video its identity. You'll craft your title, write a compelling description, and choose that all-important thumbnail.
- Video Elements: Here's where you add interactive features like end screens and cards to guide viewers to your other videos or your channel.
- Visibility: This is the final step. You decide whether to publish it immediately, schedule it for the perfect time, or just keep it private.
Taking a few extra minutes to thoughtfully fill out each section is what separates a simple file upload from a strategic content launch. It's how you give your video the best possible chance of being discovered.
Optimizing Your Video Metadata To Get Discovered
Uploading your video is just the start. A fantastic video that nobody can find is like a masterpiece hidden in a closet. This is where metadata—your title, description, thumbnail, and tags—becomes your most powerful tool for discovery.
Think of your metadata as the packaging for your video. It needs to be compelling enough to make someone stop scrolling and click. A poorly optimized video is one of the main reasons talented creators struggle to get views. It's how you signal to both potential viewers and the YouTube algorithm what your content is all about.
Crafting A Title That Demands A Click
Your title is the first—and often only—thing a viewer reads. It has to do two jobs at once: accurately describe the video and create an irresistible sense of curiosity. A good formula is to combine a keyword-rich phrase with a compelling benefit or emotional hook.
Let's say you're reviewing a camera. "My Review of the New Camera" is forgettable. But "New Camera Review: Is This a Game-Changer for Creators?" asks a question and promises a valuable answer. It makes people want to know more.
Some quick tips for your titles:
- Front-load keywords: Put your most important keywords right at the beginning.
- Use numbers: Lists and numbers, like "5 Mistakes to Avoid," often get higher click-through rates.
- Keep it concise: Aim for under 70 characters so it doesn't get cut off in search results.
Writing A Description That Works For You
The video description is prime real estate that so many creators waste. It’s not just a place to dump keywords; it's a tool to provide value and guide your audience. The first two or three lines are the most critical, as they're what people see in search results before clicking "show more."
Start with a punchy sentence that expands on the title, using your main keyword naturally. Then, structure the rest of the description to be as helpful as possible.
A well-structured description serves both humans and algorithms. It provides clear context for search crawlers while offering helpful navigation and resources for your viewers, boosting watch time and engagement.
Use timestamps to break your video into chapters. This lets viewers jump directly to the sections they care about most—a huge win for user experience. Don't forget to include relevant links to your social media, products, or other videos.
The Unspoken Power Of Tags And Thumbnails
While tags aren't as critical as they used to be, they still help YouTube understand and categorize your content. Think of broad and specific terms related to your topic. If your video is about baking sourdough bread, your tags could include "sourdough recipe," "baking for beginners," and "homemade bread."
Finding the right keywords is a skill in itself. For those who want to go deeper, our guide on how AI optimizes keywords for viral success offers some powerful insights.
Finally, let's talk about the custom thumbnail. This is arguably the most important piece of your metadata package. It’s a visual advertisement for your video.
A great thumbnail should:
- Be high-contrast and colorful to pop off the page.
- Include a human face with clear emotion whenever possible. People connect with faces.
- Use minimal, bold text that complements the title.
- Be clear and readable on small screens, like a smartphone.
Never rely on a random still from your video. Designing a custom thumbnail that communicates the video’s value at a glance is non-negotiable if you're serious about learning how to post on YouTube effectively.
To tie it all together, here’s a quick breakdown of how each metadata element contributes to your video's SEO and discoverability.
Metadata Elements and Their SEO Impact
| Metadata Element | Primary Purpose | SEO Best Practice |
|---|---|---|
| Title | Capture attention and inform the algorithm | Include a primary keyword upfront; keep under 70 characters. |
| Description | Provide context and drive engagement | Add key links and timestamps in the first few lines. |
| Tags | Help YouTube categorize the content | Use a mix of broad and specific keywords related to the topic. |
| Thumbnail | Drive click-through rate (CTR) | Design a high-contrast, visually compelling image with minimal text. |
Getting these four elements right is the foundation of a solid YouTube discovery strategy. It’s how you turn a great video into a video that actually gets watched.
Using YouTube Shorts for Rapid Channel Growth
If you're serious about growing a YouTube channel today, you can't ignore Shorts. They've moved far beyond a simple feature and have become a powerful engine for discovery. Think of them as a direct line to a massive, fast-scrolling audience that can seriously inflate your subscriber numbers. Mastering how to post on YouTube now means mastering this format.
The rules for what counts as a Short are simple but non-negotiable. Your video must have a vertical or square aspect ratio (like 9:16) and be 60 seconds or less. Nail those two things, and you've got a ticket to the Shorts feed, where the potential to go viral is off the charts.
Crafting Content for the Shorts Feed
Making a good Short is a completely different ballgame than making a long-form video. The average viewer on the Shorts feed has the attention span of a goldfish. Your one and only job is to hook them within the first 1-2 seconds. Forget the slow intros and gentle build-ups. You need to open with the most exciting, weird, or visually satisfying part of your entire video.
Once you have their attention, you have to keep it. This is where high-retention editing becomes your best friend. We’re talking quick cuts, text that pops onto the screen, punchy sound effects, and jumping on trending audio. The algorithm absolutely loves Shorts that people watch all the way through—or even better, watch multiple times.
A classic rookie mistake is just chopping up a horizontal video and calling it a day. The best Shorts are filmed vertically from the start, keeping all the important action front and center for a phone screen.
The content itself needs to be laser-focused. Deliver one clear idea, and do it fast. It could be a mini-tutorial, a mind-blowing fact, a quick skit, or just something oddly satisfying to watch. A great Short feels complete, even if it's only 15 seconds long.
Turning Quick Views Into Loyal Subscribers
The real magic of Shorts is their insane ability to rack up subscribers. For any creator focused on growth, the numbers speak for themselves. In 2024, creators collectively pulled in an estimated $3.1 billion from Shorts, and the revenue per thousand views (RPM) for Shorts has doubled in just one year.
But here's the kicker for channel growth: top creators see an average of 29.2 new subscribers per 10,000 views on their Shorts. Compare that to just 11 for long-form videos. That's a nearly 3x difference, proving how effective they are at building a community. You can dig into more YouTube Shorts performance statistics on photutorial.com.
Treat your Shorts like a funnel pointing back to your main channel. A simple, direct call-to-action is a must. End your Short with something like, "For the full breakdown, check out the link in the comments," or "Subscribe for more daily tips just like this."
When you consistently push out engaging Shorts, you create a constant flow of new eyeballs. Those viewers can then discover your longer videos, turning a fleeting view into a loyal fan. That's how a simple 30-second clip becomes one of the most powerful growth tools you have.
Scheduling and Automating Posts for Consistency
Consistency is the absolute engine of YouTube growth. But let’s be real—the pressure to upload every single day is a fast track to burnout. The secret shared by creators who've been in the game for years isn't about working harder; it's about working smarter. This is where scheduling and automation become your best friends.
Imagine this: you spend one afternoon finalizing an entire month's worth of content. Done. Instead of scrambling to get a video out each day, you can batch your work, upload everything at once, and set each video to go live at the perfect moment. This completely flips the script on how you post to YouTube, turning it from a daily grind into a sustainable, strategic system.
The Strategic Edge of Scheduling
Scheduling isn't just a time-saver; it’s a strategic weapon. YouTube’s built-in scheduler lets you hit peak viewership hours when your specific audience is most active and ready to watch.
Say you're a US-based creator, but you've got a huge following in Europe. Scheduling means you can drop a new video right in their prime time without ever having to set a 3 AM alarm.
By planning your content release schedule, you're not just posting videos; you're building a reliable presence. This consistency signals to the YouTube algorithm that your channel is active and dependable, which can positively impact your visibility.
This approach also gives you something incredibly valuable: breathing room. With a buffer of scheduled videos in your back pocket, you have the freedom to actually engage with your community in the comments, plan your next big series, or just take a well-deserved break without your channel going dark.
Adopting an Automation Mindset
True efficiency isn't just about scheduling; it's about building a workflow that practically runs itself. Think of it like a TV show—they don't film one episode at a time. They produce an entire season in batches, and you can do the same. To really nail this, you need a solid system. If you want to optimize your entire creation and publishing workflow, check out this ultimate guide to asynchronous remote work. It’s packed with powerful strategies for managing projects without needing to be "on" 24/7.
Tools can take this even further. For instance, a dedicated YouTube video scheduler often comes with more advanced features than the native uploader, which is a lifesaver for creators managing multiple channels or complex series.
Here’s a simple way to put this into practice:
- Batch Your Filming: Block out a day and film several videos back-to-back.
- Batch Your Editing: Dedicate another day just to editing all the footage you shot.
- Batch Your Uploading: Upload all the finished videos to YouTube at once, setting them as "Private" or "Unlisted."
- Schedule Your Releases: Go into each video and schedule its public release date and time.
This batching method frees you from the tyranny of the daily upload. It gives you back the mental space to focus on what actually matters: creating incredible content your audience can't wait to watch. It’s the key to maintaining momentum without losing your mind.
Got Questions? We've Got Answers
Even after you've nailed down the basics of posting on YouTube, a few nagging questions always seem to pop up. It doesn't matter if you're a brand new creator or a seasoned pro—getting quick, clear answers is key to keeping your workflow smooth.
Here are the answers to the questions we see come up time and time again.
How Long Does YouTube Processing Actually Take?
Honestly, this depends entirely on your video's size and resolution. A quick, 2-minute 1080p clip might be good to go in a few minutes, while a beast of a 4K video that's an hour long could easily take over an hour.
YouTube processes your video in stages. The first thing it does is spit out a low-quality, standard-definition (SD) version. This is so your video can be available almost immediately. Meanwhile, the high-definition (HD) and 4K versions are still churning away in the background.
My Pro Tip: Always, always upload your video as 'Private' or 'Unlisted' first. Don't flip that switch to 'Public' until you see the little 'HD' or '4K' badge pop up in your YouTube Studio. This simple step guarantees that every viewer gets the crisp, high-quality experience you intended right from the get-go.
Can I Edit a Video After It's Live?
Yes, you can—and you absolutely should. You have total freedom to change your video's metadata at any time after it's been published. This includes the title, description, tags, and even that all-important custom thumbnail.
Just head over to your YouTube Studio, find the video under the 'Content' tab, and click the 'Details' (pencil) icon. This is a super powerful tactic for breathing new life into older videos that aren't performing well or for simply updating outdated info. Any changes you make are reflected almost instantly.
What's the Real Difference Between Public, Unlisted, and Private?
Getting a handle on these visibility options is crucial for controlling who sees your content and when. Each one serves a very specific purpose in a creator's strategy.
- Public: This is the default for most people. The video is out there for everyone to see. It’ll show up in search results, pop up in recommendations, and live on your channel page.
- Unlisted: Think of this as semi-private. The video is hidden from search results and won't appear on your channel, but anyone who has the direct link can watch it and share it. This is perfect for sharing a draft with your team for feedback or giving a select audience access to exclusive content.
- Private: This is the lockdown option. Only you and specific people you invite using their Google accounts can see the video. The link is useless for sharing, making this setting ideal for personal video archives or confidential client work.
Why Does My Brand New Video Look Blurry?
Nine times out of ten, this is a timing issue tied directly to YouTube's processing, like we talked about earlier. When your video first goes live, what your early-bird viewers are seeing is that initial, low-resolution version while the glorious HD cut is still being processed on YouTube's servers.
And again, the fix is simple: upload as 'Private' or 'Unlisted.' Just wait until you can confirm in your Studio that the HD processing is complete before you make the video 'Public.' This completely prevents anyone from seeing that temporary, pixelated version.
Ready to stop the daily content grind and put your channel's growth on autopilot? ShortsNinja uses AI to help you create and schedule engaging Shorts in minutes, not hours. Input an idea, and our platform generates the script, visuals, and voiceover, then automatically publishes it for you. Try ShortsNinja today and start growing your channel hands-free!