
Look, you can't just slap a YouTube link on Instagram and call it a day. The platforms are totally different. But what you can do is chop up your best YouTube content into killer Reels, Stories, or feed posts.
It all comes down to a simple process: download your video, reformat it for a vertical screen, and then upload it to Instagram with a solid caption and the right hashtags.
Why Bother Putting YouTube Videos on Instagram?
Sharing your hard work from YouTube over on Instagram is more than just a time-saving hack. It’s a genuinely smart way to get more eyes on your content and grow your brand. Instead of grinding out something totally new, you’re giving your existing videos a second chance to shine in front of a fresh, highly engaged audience.
Think of it as strategic content recycling. That 10-minute deep dive you posted on YouTube? It could become several powerful, 60-second Reels. Each one can highlight a key tip, a funny moment, or a big reveal from the original video. This lets you connect with people who prefer short, snappy content while gently pointing them back to your main channel.
Tap Into a Whole New Audience
One of the biggest wins here is tapping into Instagram's massive user base. We're talking over 2 billion monthly active users. That’s a huge pool of potential new fans who might have never stumbled upon your YouTube channel otherwise.
This is especially true with Instagram's algorithm, which is absolutely obsessed with short-form video right now. Reels, in particular, are built for discovery, and the platform loves pushing them to people who don't even follow you yet.
Reels hit an average reach rate of 30.81%—that’s more than double what you'd get from a standard image post. They are your best bet for getting your work in front of fresh eyes.
Jump on High-Engagement Formats
The numbers don't lie: short videos are king on Instagram. On average, Reels get about 22% more interaction than regular video posts and pull in twice the impressions of any other post type.
When you reformat a key moment from your YouTube video into a Reel, you’re meeting users exactly where they are and giving them content in the format they already love. You can dig into these stats to see just how much impact this can have. That extra engagement tells the algorithm your content is worth showing to more people, creating a snowball effect for your visibility.
Choosing and Preparing Your YouTube Clip

Alright, first things first—you need the actual video file. Just dropping a full, horizontal YouTube video onto a vertical platform like Instagram is a surefire way to get scrolled past. You have to be strategic. The goal is to grab the raw footage and then pinpoint the perfect, scroll-stopping segment to share.
If you’re organized and have the original video file saved on your computer, you’re already a step ahead. If not, no worries. You'll need to download it from your YouTube channel. A good YouTube video downloader tool will give you a clean copy to work with.
Once you have the file, the real fun begins: finding that golden nugget inside your longer video.
Identifying the Perfect Clip
Let's be real, not every moment in your video is a winner. You're hunting for a short, punchy segment—usually under 90 seconds—that can stand on its own without needing a ton of context. The clip needs a strong hook and a clear, immediate takeaway for the viewer.
Think about what makes you stop scrolling. It’s almost always one of three things:
- A high-energy moment: Look for the peaks. Laughter, a surprising twist, or a burst of emotion always works well.
- A valuable tip: Can you isolate a single, actionable piece of advice that someone can absorb in less than a minute? That’s gold.
- A strong visual hook: Find a part of your video with dynamic movement, interesting graphics, or just a really cool scene.
Your YouTube video might be a slow burn, but your Instagram clip needs to be a firework. The first three seconds are everything. Find a moment that immediately grabs attention without needing minutes of context.
Matching Clip Length to Instagram Format
The length of your clip is a huge deal because it determines where it’ll perform best on Instagram. Each format—Stories, Reels, and in-feed posts—has its own vibe and technical limits. Knowing the https://shortsninja.com/blog/best-video-lengths-for-tiktok-youtube-instagram/ from the get-go is key.
For example, a quick 15-second tip is perfect for an Instagram Story. People tap through those fast, so you have to be brief. A more developed clip between 60 and 90 seconds is brilliant for a Reel, giving you enough time to tell a mini-story or explain something in more detail. In-feed video posts offer more flexibility, but let’s be honest, shorter is almost always better for holding attention.
When you pick your clip with a specific format in mind, you’re setting yourself up for success before you even touch an editing app.
Reformatting Your Video for a Vertical World
So you’ve got a great horizontal YouTube video. Awesome. But here's the thing: Instagram is a vertical world, and simply uploading your wide-screen video will make it stick out like a sore thumb. You'll get those clunky black bars on the top and bottom, which basically screams "repurposed content" to anyone scrolling by.
To get people to actually stop and watch, you need to give your video a vertical makeover. This isn't just about cropping it. It's about completely rethinking the viewing experience for someone on their phone.
Adapting Your Video Frame
First things first, let's talk aspect ratio. Your YouTube video is likely a cinematic 16:9, but that just doesn't fly on Instagram.
- For Instagram Reels and Stories, you absolutely need to go with a 9:16 aspect ratio. This fills the entire phone screen, creating that immersive feel you're after.
- If you're posting to the main Instagram Feed, you have a bit more flexibility. A 1:1 square is classic, but a 4:5 vertical format actually takes up more screen real estate and tends to perform better.
Getting the frame right is your first step to making your video look like it belongs. If you want to get really nerdy about the perfect dimensions for every platform, we've got a full breakdown in our guide to the best aspect ratios for social media.
The image below gives you a quick visual on how these technical details come together.
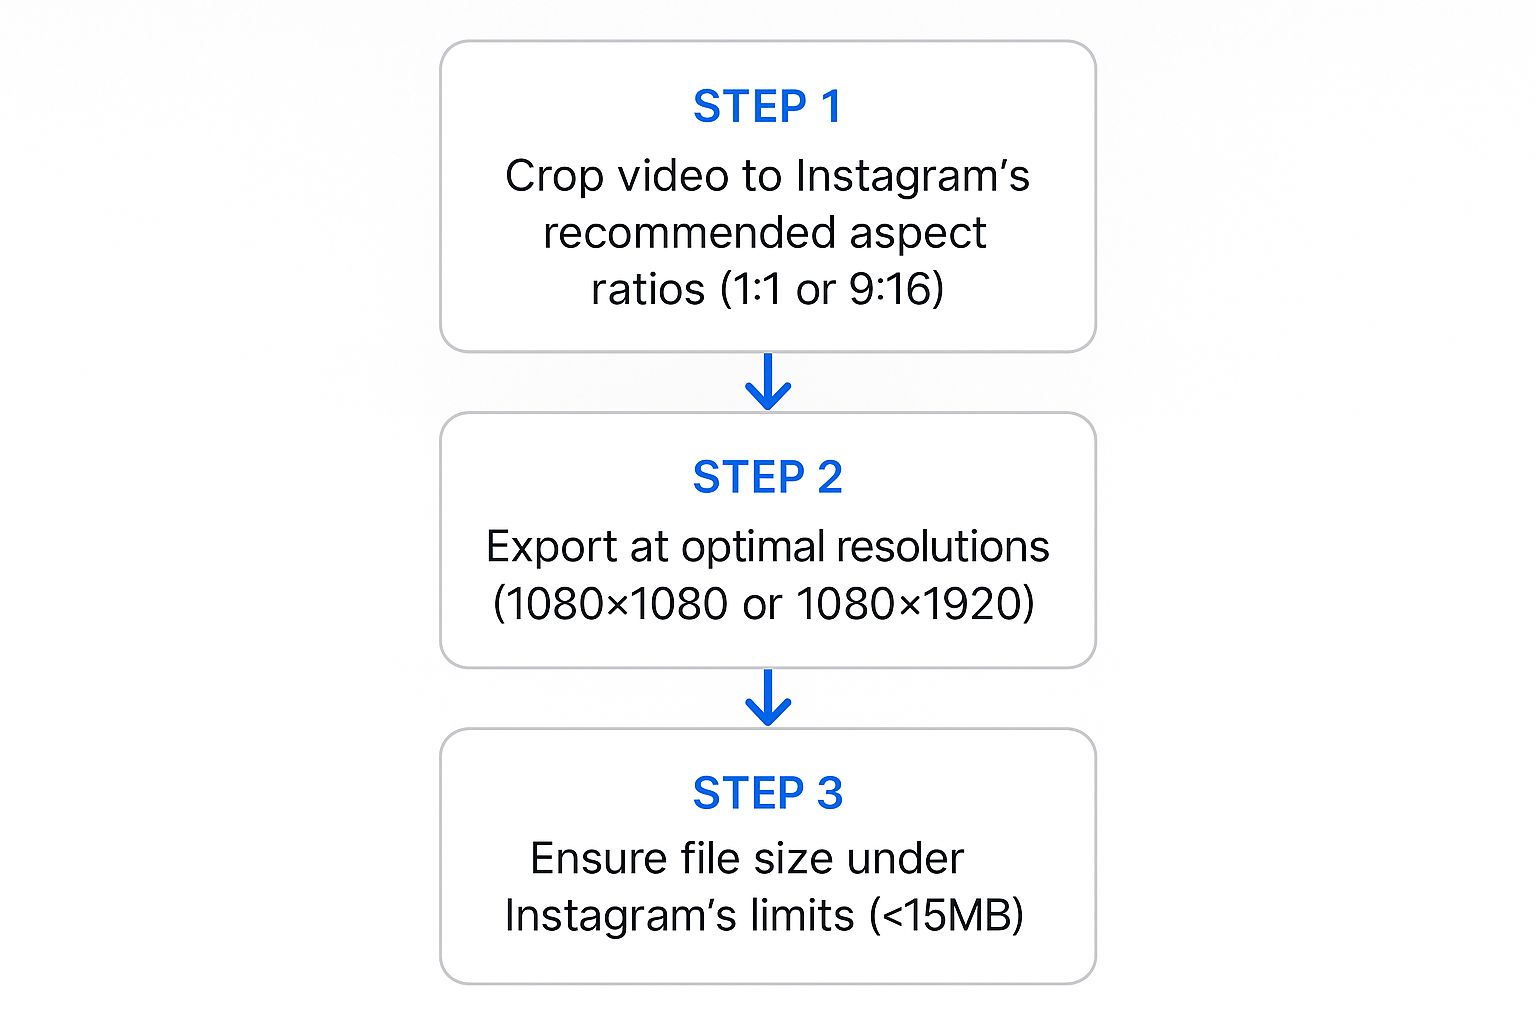
As you can see, nailing the technical specs—aspect ratio, resolution, and file size—is crucial for making sure your video looks crisp and professional on Instagram.
Instagram Video Format Specifications
To make things easier, here's a quick cheat sheet for the different Instagram video placements. Getting these specs right from the start saves a ton of headaches later.
| Placement | Aspect Ratio | Recommended Resolution | Max Length |
|---|---|---|---|
| Reels | 9:16 | 1080 x 1920 pixels | 90 seconds |
| Stories | 9:16 | 1080 x 1920 pixels | 60 seconds (per slide) |
| Feed Post | 1:1 or 4:5 | 1080 x 1080 or 1080 x 1350 pixels | 60 minutes |
Keep this table handy when you're editing. It ensures that whatever you create is perfectly optimized for where it's going to live on the platform.
Adding Native Instagram Elements
Once your video is framed correctly, it’s time to add those extra layers that stop the scroll. Let's be real: a huge number of people watch videos with the sound off. That means adding captions or subtitles is non-negotiable. It makes your content accessible and ensures your message gets across, silent or not.
But don't stop there. Think about these enhancements:
- On-Screen Text: Use bold text overlays to call out key takeaways or ask a question. This gives viewers instant context for what they're watching.
- Trending Audio: For Reels, this is a game-changer. Swapping your original audio for a trending sound can give your video a massive boost in reach. The algorithm loves it.
Remember, the goal is to make your YouTube clip look like it was made for Instagram. A little effort in reformatting goes a long way in stopping the scroll and earning engagement.
You don't need a Hollywood budget for this, either. Mobile apps like InShot or CapCut are brilliant for quick edits on the fly. You can resize, trim, and add text right from your phone. If you need more horsepower, desktop software like DaVinci Resolve or Adobe Premiere Pro gives you ultimate control. The best tool is the one that fits your workflow and gets the job done.
Getting Your Video Up and Optimized for Impact
Alright, you've got your perfectly edited clip. Now for the fun part: posting it on Instagram and making sure people actually see it. This isn't just about hitting "share." It's about strategically packaging your video to get people talking, boost its discoverability, and hopefully, send new fans back to your YouTube channel.
Think of your caption as your conversation starter. Don't just describe what's happening in the video—that's what the video is for. Instead, pull people in. Ask a pointed question, share a behind-the-scenes thought, or kick off a debate related to your clip. Your goal is to stop the scroll and get thumbs tapping in the comments.
Choose Your Format Wisely
Where you post your video on Instagram—Reel, Story, or in-feed—really matters. Each format has its own job and hits a slightly different slice of your audience.
- Reels: This is your engine for growth. If you want to reach people who have no idea who you are, Reels are your best shot. Instagram's algorithm pushes them hard.
- Stories: These are perfect for quick, informal teasers. The huge win here is the "link" sticker, which lets you send people directly to your full YouTube video. Use it.
- Feed Posts: Solid choice for your existing followers. While they don't have the same viral potential as Reels, they live permanently on your grid.
The numbers don't lie. Influencers see way higher engagement on Reels, averaging 2.08%, while standard video posts lag behind at just 0.42%. That difference means a YouTube snippet turned into a Reel is going to work a lot harder for you.
Your thumbnail or cover image is the first impression. Make it count. Pick a bright, high-contrast frame from your video that screams what it's about. A killer cover can be the single reason someone decides to watch.
Finally, you need a clear call-to-action (CTA). Since you can’t drop clickable links in Reel captions, you have to spell it out for your audience. A simple "Full video in my bio!" or even "Comment 'VIDEO' and I'll send you the link" gives people a clear next step and can turn a passive viewer into a potential subscriber.
To really get ahead, it helps to understand the psychology and ROI of short-form video content. And for a deeper dive, check out our complete guide on Instagram Reels best practices to get the most out of every single post.
Common Mistakes to Avoid When Repurposing
Successfully repurposing your YouTube content for Instagram is a huge win, but a few common slip-ups can quickly derail your efforts. You'll want to avoid these pitfalls to make sure your video feels native to the platform and not like a lazy copy-paste job.
One of the most frequent errors is just flat-out ignoring the vertical format. When you post a horizontal YouTube video directly to Instagram, you get those dreaded black bars on the top and bottom. This instantly signals to viewers that the content wasn't made for them, and honestly, it's a surefire way to get them to scroll right past.
Always take the extra five minutes to crop your video to a 9:16 aspect ratio for Reels and Stories. It makes all the difference.
Neglecting Sound-Off Viewers
Another major oversight is forgetting that a huge portion of Instagram users watch videos with the sound off. If your clip relies on someone talking, you absolutely must add captions. Without them, your message is completely lost on a huge chunk of your potential audience.
A study found that up to 85% of videos on social media are viewed without sound. Forgetting subtitles means you're willingly ignoring the majority of your viewers.
Adding captions makes your content more accessible and ensures your key points land, whether the volume is on or not. It’s a non-negotiable step.
Uploading Low-Quality Clips
Finally, never sacrifice video quality. Compressing a high-definition YouTube video too much or uploading a blurry, pixelated clip just makes your brand look unprofessional. Your Instagram content is a direct reflection of your brand's overall quality, so don't cut corners here.
To keep things looking sharp, make sure you:
- Export your edited clip in at least 1080p resolution.
- Use a reliable method like AirDrop or Google Drive to transfer the file to your phone to prevent quality loss.
- Always preview the video on Instagram before posting. This is your last chance to catch any weird visual glitches.
By sidestepping these common mistakes, you ensure every piece of repurposed content looks polished, professional, and perfectly optimized to capture attention on Instagram.
Common Questions Answered
So you're ready to start sharing your YouTube content on Instagram, but you've got a few lingering questions. It's totally normal—navigating the rules of different platforms can feel like a minefield. Let's clear things up with some straight answers to what creators ask most.
Can I Post My Entire YouTube Video on Instagram?
The short answer is no, not really. Instagram's time limits are the main roadblock. Reels are capped at 90 seconds, and while you can post longer videos to your feed, the reality is that Instagram users have much shorter attention spans.
Think of your Instagram post as a high-energy movie trailer, not the full feature film. The winning move is to pull out a super compelling 60-90 second clip that showcases the absolute best parts of your video. Your goal is to get people hooked and then send them straight to your YouTube channel to see the rest.
Is It Okay to Post Someone Else’s Video?
Absolutely not. Grabbing another creator's YouTube video and posting it on your Instagram without their direct permission is a big no-no. It's a copyright violation, plain and simple. Doing this can get your post removed, and in some cases, your account could face penalties. This guide is all about repurposing your own awesome content.
If you truly love someone else's work and want to share it, always ask for their permission first. A much safer and more supportive approach is to use Instagram's built-in sharing features, like adding their post to your Story. This gives them proper credit and keeps you in the clear.
What’s the Best Way to Link Back to My YouTube Channel?
This is where you need to get a little creative, since Instagram doesn't allow clickable links in the captions of feed posts or Reels. Here’s how the pros do it:
- Your Link in Bio is Gold: This is your prime real estate. Use a tool like Linktree or Later to create a simple landing page that holds all your important links, making it super easy for followers to find your YouTube channel.
- Use the Story Link Sticker: Instagram Stories are your secret weapon for direct traffic. The "link" sticker lets you drop a clickable URL that takes people right to your full YouTube video. It’s the most direct route you have.
- A Clear Call-to-Action is a Must: Don't assume people know what to do next. Spell it out for them in your caption, in your on-screen text, and even verbally in the video. A simple, "Full video is live now—tap the link in my bio to watch!" makes a huge difference.
It's worth noting that by 2025, a massive 92% of creators report that brands prefer Instagram Reels for influencer campaigns. By turning your YouTube content into punchy Reels, you're not just engaging your audience—you're aligning with the biggest trend in the creator economy. You can dive deeper into these numbers in Division D's influencer marketing statistics report.
Ready to create stunning short-form videos from your ideas in minutes? ShortsNinja uses AI to automate the entire process, from scripting to generating visuals and scheduling posts. Stop spending hours editing and start growing your channels effortlessly. Try ShortsNinja for free and see the difference at https://shortsninja.com.